Forum Motards BM'istes

Forum pour les passionnés de motos BMW

Le Deal du moment : -28%
Brandt LVE127J – Lave-vaisselle encastrable 12 ...
Voir le deal
279.99 €

Vous n'êtes pas connecté. Connectez-vous ou enregistrez-vous

Cheminement Tuyauterie essence K75 S

+2
chris281088
jean64
6 participants

Aller en bas  Message [Page 1 sur 1]

1Cheminement Tuyauterie essence K75 S Empty Cheminement Tuyauterie essence K75 S Jeu 1 Nov 2012 - 11:36

jean64

jean64
En rodage
En rodage

Bonjour à tous
J'ai démonté pour la première fois le carénage de ma K75s et surprise! je vous laisse découvrir.
Pouvez vous me dire où doit passer ce tuyau d'essence, car j'ai essayé de le faire passer entre la durite du liquide de refroidissement et le cadre et il ne passe pas! Dois-je faire un forcing?
Merci de vos réponses. Cheminement Tuyauterie essence K75 S Tuyau_10]

chris281088

avatar
Jeune pilote
Jeune pilote

Salut
Moi je l'ai fait passer sous le maintien en plastique du carenage... laisse un peu de mou pour pouvoir le placer correctement...

Je peux te dire que au depart quand je l'ai monter comme toi je ne me suis pas apercu de ma gaffe... sur la route je l'ai vite compri Very Happy

le ralenti ne tien plus et la moto galere...
:cheers3:

SEGAFREDO

SEGAFREDO
Modo régional
Modo régional

C'est curieux que ça ne passe pas, il y a largement la place confused 
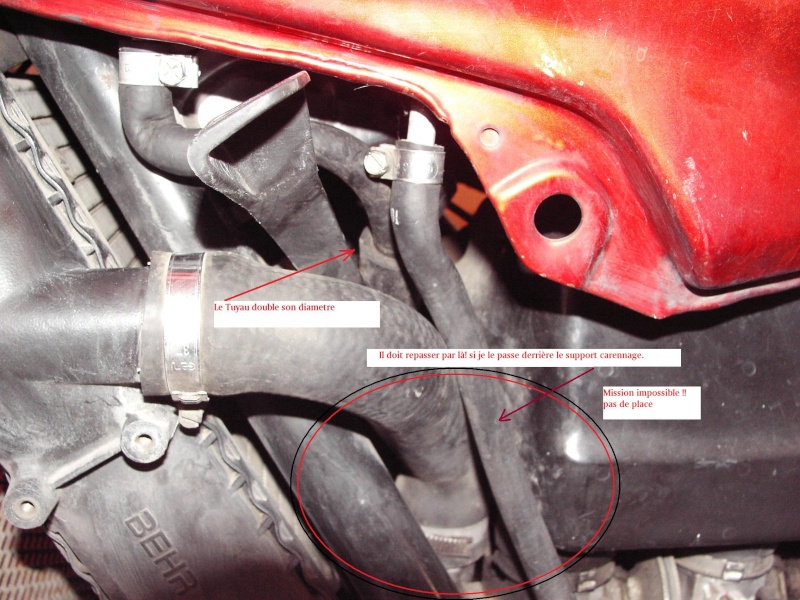
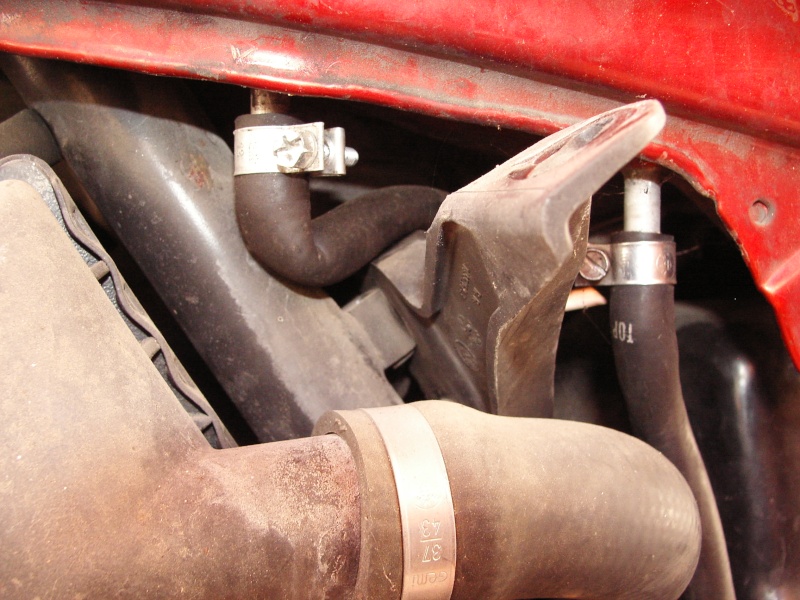
Cette durit est bien verticale et "disparaît" ensuite derrière la rampe des papillons.

chris281088

avatar
Jeune pilote
Jeune pilote

ben en fait quand tu replace bien le reservoir sa pince la durite a cause du soutient de carenage... et la durite passe derriere les papillons et va se finir sur le regul de pression d'essence... :bien:

Freddy29

Freddy29
Administrateur
Administrateur

tes durites ne sont pas suffisemment enfoncées


_____________________________
Organisation Rassemblement Salins-Les-Bains 2024

Cheminement Tuyauterie essence K75 S Jura_218

maurice58

maurice58
Gros Rouleur
Gros Rouleur

Bonjour,

....et celle de gauche (le retour) est pincée....

Cordialement

jean64

jean64
En rodage
En rodage

Bonsoir à tous!
Merci pour vos réponses. :bien:

Quelqu'un sait t il le cheminement de ce tuyau à l'origine.

-> Chris281088: J'ai essayé de le passer comme tu as dit mais ça force beaucoup! surtout qu'à 10 cm plus bas le tuyau double son diamètre.
Ci dessous quelques photos. Peux-tu me dire à quel endroit tu l'as passé ?
->SEGAFREDO: Et pourtant!... J'ai essayé! mais avec beaucoup de "Forcing" je vais peut être y arriver si c'est vraiment le Cheminement.
-> Freddy29: Merci de ta remarque, c'est le travail de l'ancien proprio ou de son mécano que je vais certainement corrigé.

Cheminement Tuyauterie essence K75 S Passag10

SEGAFREDO

SEGAFREDO
Modo régional
Modo régional

Je vais me fendre d'une photo ça t'aidera peut-être ...
Le tuyau double son diamètre ??? Ton binz semble curieux ...

jean64

jean64
En rodage
En rodage

Je trouve logique car le tuyau passe derrière le ventilo (temperature avoisinant les 90 degré). J'en deduit que ce doublage sert d' isolant. Bref ce n'est qu'une supposition.
Merci d'avavce SEGAFREDO

jean64

jean64
En rodage
En rodage

Le doublage ressemble fort aux gaines d'isolation des tuyaux d'eau chaude sanitaire.

maurice58

maurice58
Gros Rouleur
Gros Rouleur

Bonjour,

C'est surtout pour le protéger des abrasions.

Cordialement

12Cheminement Tuyauterie essence K75 S Empty Re: Cheminement Tuyauterie essence K75 S Lun 26 Juil 2021 - 15:16

vitam

vitam
En rodage
En rodage

Bonjour,

Je me permets de rebondir sur ce sujet.

Y a-t-il un tuto quelque part pour le changement de la première durite essence ? Celle qui est coudée et qui part sous le réservoir.

La mienne est déchirée, pour la remise en route (après 1 an d'immobilisation) elle a cédé.
Je dois donc la changer.

Si pas de tuto, quelqu'un a la vue éclatée avec les étapes à respecter ?

En vous remerciant d'avance pour votre temps et réponse.
Une belle journée estivale.

++V++
Laurent

13Cheminement Tuyauterie essence K75 S Empty Re: Cheminement Tuyauterie essence K75 S Lun 26 Juil 2021 - 20:02

vitam

vitam
En rodage
En rodage

bon, je me réponds, trouvé la réponse sur motobrick.

un peu galère néanmoins

1- Remove the gas tank and disconnect both fuel lines from it.

2- Remove the belly pan.

3- Remove the left inner knee panel.

4- Remove the left fairing lower.

5- At the lower front of the fuel rail disconnect the fuel line that runs through the throttle bodies to the fuel pressure regulator.

6- Remove the right inner knee panel.

7- Remove the right fairing lower.

8- Remove the air intake snorkel.

9- Remove the three clips holding the upper and lower halves of the air box together. The right rear one is obvious. The left rear one is somewhat buried and is easiest to access it if you take the top coil cover off and push some wires out of the the way. The front one is "upside-down" and somewhat hidden on the front of the air box.

10- Push the foam heat barrier on top of the air box around to the front to allow a little more upward play in the top half of the air box.

11- Remove the air filter. Note that there is no lip on the left upper edge so the "easiest" way to remove it is to lift the air filter up at the back as much as you can and then pull it straight out to the right side of the bike. (If you're replacing the fuel lines then this is also a good time to consider replacing the air filter - or at least blowing some compressed air through it from the top to clean it out a bit.)

12- Remove the lower half of the air box. Unlike the earlier Ks, the lower air box on a K1100 is not bolted to the engine block so you can pull it right out. It's a bit of a wrestling match though given the tight space. What worked for me was pushing it forward a little, then rotating it counter-clockwise and pulling up and back and out at about a 45 degree angle.

13- Remove the fuel pressure regulator. It's bracket is mounted to the rear of the throttle body assembly at the top via two Phillips head machine screws.


14- Remove the Oetiker clamps securing the two fuel lines to the fuel pressure regulator. (I use a Dremel cutting wheel in the center of the "pinch.")

15- Cut your new fuel line to replace those two hoses. Note that generic fuel line won't have a pre-curved right angle in it on the one to the fuel rail so you'll want to make that one about a half an inch longer than the old one so that it doesn't kink where it connects to the fuel rail.

16- Connect your new lines to the fuel pressure regulator.


17- Reinstall the fuel pressure regulator. Note that the line from the fuel pressure regulator to the tank goes in between the "elephant trunks" for the #3 and #4 throttle bodies.

18- Replace the fuel line between the fuel rail and the gas tank with one of approximately the same length.

19- Put everything back together in the reverse order of how you took it apart.

Contenu sponsorisé


Revenir en haut  Message [Page 1 sur 1]

Permission de ce forum:
Vous ne pouvez pas répondre aux sujets dans ce forum